The Simplification Tool in Autodesk Inventor allows you to convert complex assemblies into a simplified part file, that can be used for many purposes such as:
- Sharing a design with a client for the purpose of measuring the dimensions of the part whilst still protecting intellectual property (IP).
- Simplifying a complex assembly that is required to be placed in a larger assembly, thus improving performance when working with large assemblies and complex parts.
- Creating BIM content to be used in other Autodesk products such as Revit or AutoCAD.
We will be using this simplification tool to turn our standing desk assembly into a simplified part file, which we can then export as BIM content to be used in Revit later on.
The updated Simplification Tool in Inventor 2024 provides you with more options to reduce the component and feature count and complexity of your model.
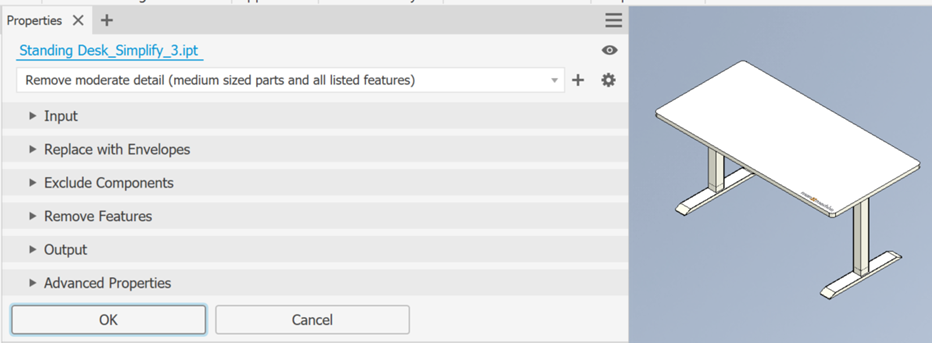
The first option you are presented with is to select a preset that allows Inventor to calculate the simplification required. Presets assign values to the fields further in the property panel. You can override any value and you can also create your own custom preset if you use the simplification tool frequently.
The preset options range from no simplification, to converting all parts with envelopes, as seen in the preview below.

The Input tab allows you to select the Model State, View, and Position of the assembly. You can use Inventor’s standard creation and manipulation tools to create a simplified version of your assembly, and save that as a model state before bringing it into the simplification process to further refine the model.
Replace with Envelopes provides the means to replace components with simple shapes. When you click on an option, the preview shows the parts represented as envelopes.
The replacement choices are:
 None
None
 All in One Envelope – creates an envelope around the top-level assembly.
 Each Top-Level Component – creates an envelope around assembly first-level components.
 Each Part – creates envelopes for all parts in the assembly.
Exclude Components – provides options for selecting components to include in or exclude from the simplified part. Select individual components or all occurrences of a component.

Remove Features provides options for selecting features by type and size to include in or exclude from the simplified part. The list of features includes holes, fillets, chamfers, pockets (subtractive), embosses (additive), and tunnels (single and multiple entry). Internal voids are automatically removed.
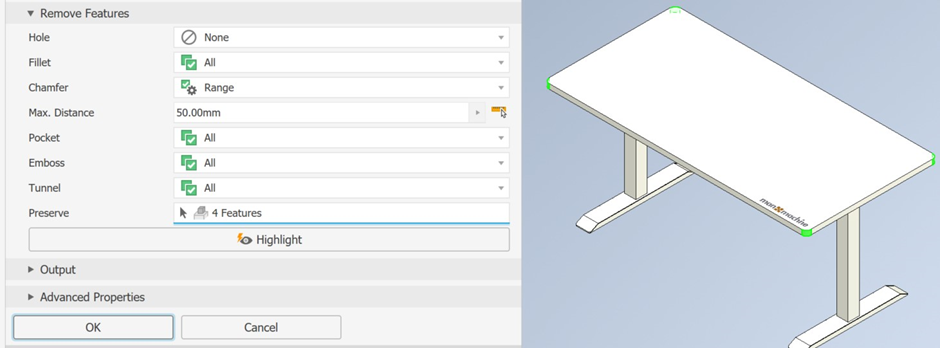
The replacement choices are:
 None (default) – no features of this type are removed.
 All – all features of this type are removed.
 Range – all features equal to or smaller than the specified parameter are removed.
Preserve – click the selector and select the features you want to retain from those being removed.
In the example above, all the fillets, pockets, embosses and tunnels will be removed, any chamfer smaller than 50 mm will be removed and all holes will be retained. We have chosen to keep the 4 fillets around the top of the table using the preserve option, these are highlighted in green in the preview.
You can combine the use of Presets, Replace with Envelopes, Exclude Components and Remove Features to refine the simplified model you want to output.
The last option is to define the Output type and structure for your intended use. Three output choices are provided:
- New Part File – outputs an Inventor part based on the selected template.
- Substitute – outputs a simplified Inventor part that populates in your current assembly as a Substitute Model State.
- Revit Model (RVT) – outputs your Inventor design as a Revit model (RVT).
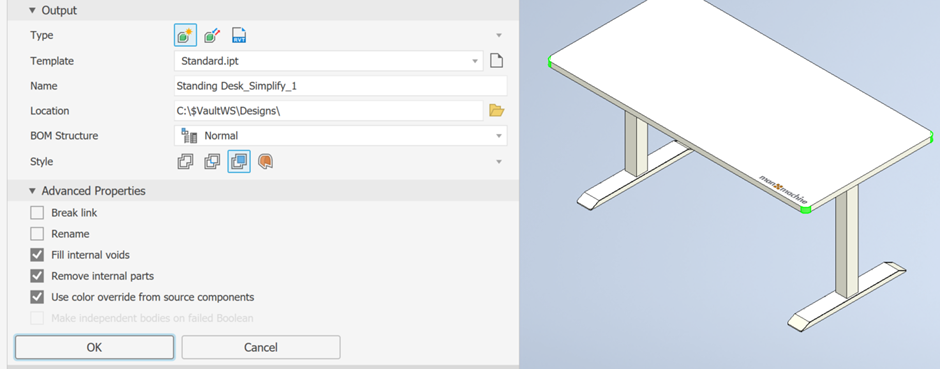
Template – sets the part template file to use for the new part file output. You can choose between Sheet Metal or Standard part templates or navigate to a custom template.
Name – The default uses the assembly name and adds a suffix, or you can edit the field to rename the simplified part.
Location – Sets the location of the new file.
Advanced Properties – provide other settings that help manage the simplify output:
- Break Link to disable updates permanently and remove associativity between the parent assembly and the simplified part.
- Fill internal voids to fill all internal void shells in the simplified solid body part.
- Remove internal parts selected by default. Parts deemed not visible by Inventor are removed.
The fill internal voids and remove internal parts options are especially useful for protecting IP and reducing the complexity of the model.
Using a combination of the different tools available to us, we have simplified our standing desk and added a substitute Model State in our assembly which we can then use to export out as BIM content.
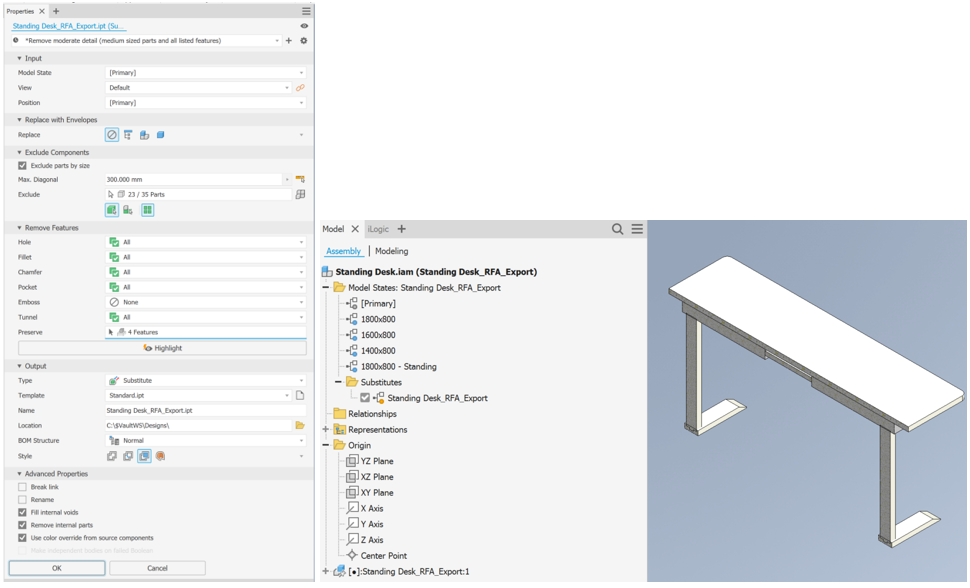
All the secondary features such as holes, fillets, and internal parts have been removed, and the voids have been filled in. This creates a much lighter part that can be used in further applications. We can also see that the Standing _Desk_RFA_Export has been added to our Substitutes Model State Folder. In addition, you able to modify this simplified model further using Inventor’s standard modification tools.
If you would like to learn how to export your simplified model as BIM Content to be used in Autodesk’s accompanying applications, such as Revit or AutoCAD MEP, check out this blog.
For more information on this blog post, or if you have any other questions/requirements, please complete the below form:
Related Links
Autodesk Inventor – Man and Machine
Autodesk Inventor Training – Man and Machine
Autodesk Inventor CAM Training – Man and Machine
Autodesk Product Design and Manufacturing Collection – Man and Machine
Inventor Training – Solid Modelling Introduction – Man and Machine
Autodesk Inventor – Autodesk Platinum Partner – Man and Machine


